Club Usage Training
How To Open and Close the Club
GUIDELINES FOR CLUB MEMBERS & BARTENDERS
A. WHEN BARTENDING PLEASE ARRIVE EARLY: Give yourself time to have the club and bar ready for your shift and to relax before you start. Generally, 30 minutes will give you time to get organized.
- WITH YOUR MEMBERSHIP CARD, OPEN THE FRONT DOOR OF THE CLUB: Leave unlocked with tool from front office drawer. The key for the backdoor is hanging on the bulletin board.
- NEXT TO CLUB ROOM DOOR: Turn on Bar room lights. Main dining room light switches are behind bar stereo.
- HEATING & COOLING: There are two two thermostats. One is located near the kitchen entrance and the second one is located near the side door in the dinning room. Do not change any settings besides changing the temperature up and down. At the end of the night the thermostats will return to their program.
- WITH YOUR MEMBERSHIP CARD, OPEN THE KEY LOCK BOX AT THE END OF THE BAR. Here you will find the keys to open cash register cabinet and the key to turn on the cash register Turn register key to REG 1.
B. OPEN CASH REGISTER TO GET KEYS TO OPEN LIQUOR CABINET AND COOLERS (The locks all use one key)
C. THE KEG COOLERS. Engage the tapping mechanism by pushing down the tap lever or turning the tap lever clockwise located on the top of keg. Check if CO2 canister is turned on. Located next to bar sink. Spare CO2 tanks are in the storage room off the hallway. If you must change the CO2 tank use the wrench that is attached to the empty tank and be careful not to lose the small washer that goes between the tap and the canister. Extra kegs are in cooler behind the bar and in kitchen cooler. When changing out kegs, get them from the bar cooler FIRST! Kegs in the kitchen refrigerator are sometimes for special events. Empty kegs should be put in the storage room.
D. OPEN EXIT DOORS BY REMOVING SECURITY BARS. You should do this by lifting the bars up and set them back on the push bars on the door cable is connected to. (The Fire inspector requires these to be removed when more than 12 people are occupying the club)
E. MAKE SURE YOU HAVE ENOUGH CHANGE. The register should start with roughly $100.00
- Before starting be sure to check for any special pricing. Are you doing cash sales versus ticket sales as the prices may change on certain items and specialty drinks may be available.
- Check for lemons, limes, etc., that may be required for certain drinks at the party. Cut up what you need.
- Fill sinks for the washing of the glasses – soap, rinse and sanitize.
- You are now in charge of the bar and who goes behind the bar. Have fun, be safe, check I.D.’s, and remember friends don’t let friends drive drunk.
- At the end of your shift or evening be sure to check for and collect any remaining tabs. All tabs must have a credit card left before allowing tab to be run. Follow the instructions on the credit card machine to run the card and receipts. Cash can be accepted to settle tab if customer wishes and card can be returned at that time. Any Credit Cards left at the bar go into the cash register so the Member can get it out themselves.
F. CLOSING OUT THE BAR:
- Turn off the coffee pot. Wash all remaining glasses. Wipe down bar and tables. Clean floor if needed. All cleaning supplies and trash bags are located in the hall closet.
- Count the cash in register and tip jar.
- Leave approximately $100.00 in 10's, 5's, & 1's in cash register.
- Put the tips and the balance of the cash (bills only) in an envelope. Envelopes are near the register on the shelf or bar. Fill out the envelope in the appropriate blanks and put the envelope in the safe.
G. CLOSING THE CLUB: RE-LOCKING ALL THE THINGS YOU UNLOCKED.
- Replace security door bars.
- Disengage the tapping mechanism (DO NOT REMOVE TAPPER FROM KEG) and lock Beer Keg Coolers and Back Bar Coolers. Turn off liquor cabinet lights, turn off lights inside beer coolers, close and lock the liquor cabinets. Put these keys back in the cash register drawer. Turn off CO2 canister only if it was off when you opened.
- Turn OFF / LOCK Register. Close and lock cash register cabinet.
- Put the appropriate keys back in the Bar Lock Box.
- Place the empty can and kegs in the hallway storage closet in the appropriate boxes (there is a sign on the wall indicating which brands can be combined).
- Empty the garbage cans in the bar area and put in new liners. Turn off lights in bar and dining areas and radio/CD player. Take the garbage out and throw it in the dumpster. If needed the vacuum cleaner is in the furnace room.
NOTE: If club members are present and they wish to remain, you should complete all steps above and have the other members reopen the bar.
H. TURN OFF LIGHTS AND LOCK ALL DOORS. Only lock interior doors that were locked when you entered the Club. For exterior doors, all should be locked unless there is a special event with other Clubs staying. Check to see if the back door should be left unlocked for that reason.
I. IF YOU HAVE ANY PROBLEMS CALL ONE OF THE FOLLOWING: Their names and phone numbers are in the handbook located behind the bar. 1. VICE COMMODORE 2. DIRECTOR OF INSIDE MAINTENANCE 3. CLUB MANAGER.
Pump-Out Station Operating Instructions
- Get the pump box key from cork wall inside of the club
- Unlock the white box at the land side end of the dock, and open the lid (place lock and key where you can find it)
- Pick the pump-out deck fitting that fits your boat
- Remove your deck cap and screw in the pump-out deck fitting
- Uncoil the 2” hose from dock rack, put the end of the hose two to four inches below the water line of the river, and let the rest of the hose float in water Do not let end go to the bottom of the river!!!)
- Uncoil the water hose from the dock rack and place near the pump-out fitting
- Turn on the water valve located on, and below grade of, the seawall
- Start the pump with the toggle switch inside the white pump box and then quickly pull the hose out of the water and fasten to you deck fitting by pulling the handles up locking the hose on
- Continue pumping until you see nothing flowing in the clear section of hose near the end attached to the pump-out fitting (hose in water will float when your tank is empty)
- When flow stops, disconnect hose from deck fitting and let the end of the hose hang so that it is just below the water line, do not let end go to the bottom of the river!!!
- Refill the holding tank with clean fresh water to flush tank, (turn on valve on the discharge end of the water hose and turn back off when done) do not over fill
- Repeat as required until the flow is clear or until you are satisfied
- Disconnect hose from deck fitting and let the end of the hose hang so that it is just below the water line to clean out of hose, do not let end go to the bottom of the river!!!
- Flush your deck, and the dock with water
- Turn of the pump and water
- Coil the hoses, one at a time and in a neat fashion, back onto the dock stand
- Replace your deck cap, and return the pump-out deck fitting to the pump box
- Close pump the box lid and lock it
- Return key to corkboard inside of the club house
- Wash your hands
- Clear your boat from pump station dock so the next boat can come in
SMALL BOAT HOIST
Operating Procedure
The scope of this procedure is to instruct an authorized NSSC member on how to operate the Small Boat Hoist, referred to as the jib crane.
To become authorized please review the NSSC Handbook, Policy and Procedures, Well, Gin Pole & Small Boat Hoist Policy, section 11, Small Boat Hoist.
Upon arriving at the jib crane, survey the crane and surrounding area and notice any abnormalities that may affect your plan for lifting and placing your boat.
Turning on the power:
- Make sure the red handle on the disconnect box, mounted on the side of the crane structure, is in the “OFF” (down position) before proceeding.
- While facing the large blue electrical panel, unlock and open the right hand door. Open the lower left panel and find a breaker labeled “Jib Crane Controller” and a tandem breaker labeled “Jib Crane”. Switch both of these breakers to the “ON” position. This will turn on the 3 phase electrical converter that will power the hoist. This circuit is on a 20 minute timer to assure the converter does not overheat and become damaged. If it trips before you are finished, reset the tandem breaker. For safety purposes it is wise to return the disconnect handle to the off position before resetting the breaker.
- Throw the red handle on the disconnect box to the “ON” (up position).
Operating the hoist:
- The hoist is now ready to be operated by using the up & down buttons on the control box on the lanyard.
- Applying light finger pressure to the up/down buttons will move the hoist at slow speed and firm pressure with move the hoist at fast speed. If the hoist doesn’t operate properly contact the Fleet Captain for assistance. Do not attempt any repairs or adjustments to this equipment.
- Positioning of the hoist is done by manually pulling the hook to the desired position. This will move the hoist back & forth on the beam it is attached to and will also cause the upper unit to rotate around the vertical structure.
- Caution: Rotating may cause the electrical cable to wrap around the structure. Free the lanyard so it can move with the hoist.
- Lifting straps, bridles, or eyes used for lifting a boat with this crane are the sole responsibility of the boat owner. The club does not own any of this equipment due to insurance liabilities. Do not mistake devises left at the site as approved or safe for lifting your boat.
Closing up shop:
- Return the hook to just below the full up position and cleat it down to the sea wall to prevent it from moving.
- Throw the disconnect switch to “OFF”.
- Open the electrical control panel, turn off the “Jib Crane” breakers, close up and lock.
- Before leaving, survey the crane and surrounding area to assure the carne is properly secured, disconnect box “OFF”, and the area returned to its original or better condition.
Suggestions on use:
- We strongly recommend a minimum of two people be present when operating this equipment. If you are lifting a boat with the mast-up we recommend three or more people. You need:
- One person to operate the hoist and keep an eagle eye on the boat and the hoist as it is moving.
- One or two people to control the boat using tag lines on the front and rear of the boat.
- One person to watch the mast and its relationship to the crane structure, loose halyards, struts, back stays, etc.
- Purchasing straps, harnesses, or lifting eyes designed and sold by the manufacture of your boat may save a bundle of your time and money and offer more safety than trying to design your own.
- Positioning the boat at the end of the cut is most desirable due to:
- There are pilings that will keep the boat off the sea-wall.
- The electrical apparatus located on the cranes upper structure will be on the “street side” of the crane.
Working on the Race Committee Boat
Pre-race preparation:
- Identify the PRO (Principal Race Officer) three weeks prior to race.
- Insure NOR and SIs are correct and usable and available.
- Communicate with the sailors to make sure all are on the same page with the same expectations. (hand held radio works best in this venue)
- Line up the proper amount of people to support the committee boat-dependent on the experience level and the racing fleets, starts and equipment. (a minimum of six people)
- Be sure that everyone understands the first five minutes (or three minutes) are critical.
- All actions must be done with urgency.
- If an error is made in the starting process the AP will restart the process until it is right.
- Mark boats must listen and communicate on the radio at all times.
- KNOW THE FLAGS. (If there is a matter that needs to be discussed in limited company use (the cell phone.)
- Race Equipment - the more automated the process is the easier and more accurate it probably will be. Electronically controlled countdown systems can replace one full person; timing is a difficult job especially if the same person is doing another function. (Know what to do if automated system does not work or malfunctions)
- Anemometers, wind vanes, sticks with light weight yarn, handheld compasses and good binoculars are all tools of the trade.
- Know how and when to raise and lower flags. Flag are the primary signal; sounds are optional and can be missed without effect.
- Scratch sheet for boats registered-complete with boat name, sail number. Extra lines for the infamous late arrivals. Don't worry if they paid. That's the OA problem.
- Check weather - Weather Underground, Sailflow, Weatherbug.
- Make sure the boat(s) you are using is capable of supporting a race-be prepared to help in any way possible. Owner operators who don't know how to pilot their boats are common i.e. know how to allow for transit to the race course, know how to use the GPS, Chart Plotter, understand how to anchor and deploy the anchor rode, have staff willing and able to help.
On Station:
- Be on station one hour prior to first warning.
- Sight wind regularly and write down all observations: velocity and direction.
- Decide length of starting line (1.2 times the total length of all boats in the largest class in feet or yards in normal weather of 15 knots wind, longer in heavy weather).
- When necessary have a pin end monitor to insure all OCS starts are recognized. It is not necessary to call or inform OCS boats if they are over, it is recommended when possible.
- Any boats not clearing must be recorded on the scratch sheet.
- Getting to the starting location with enough time to set-up. (refer above)
- Committee boat personnel work assignments (PRO, wind god, Prep Flag, Class Flag, AP, Line sighter and backup, communication signals i.e course heading, buoy color, course description in length and type (W/L, triangle W/L, Point to Point, Digital N, Mid course SF) REMEMBER sailors can be confused in the heat of competition.
- Follow the sailing instructions - no matter what. (If they are incorrect in your opinion or don't agree with USS rules they are what to OA has put in place. Many times RCs are hamstrung by inadequate SIs.)
- Determining which course gives the sailors the best rac. Clogg's Rule: "Sailors came out to Race _ Give them the best race you can." Talk to the sailors and get their input when possible. (Do this again after race to verify the RC performance and help you become a better race officer.) Note: For instance the DRYA C course racers in a two lap race hope to have one good windward beat and one good leeward run. They love course changed for wind direction change. They do not like light air and generally welcome a race shortened at the leeward mark.
- Setting the starting line - as perpendicular (square) to the prevailing wind the better the start. Oscillating wind direction is a challenge of sailing to catch the lifts and tack out of a knock. 5 degree changes in wind direction which do not recover especially if the predicted (Sailflow or Weather Underground) predicts a direction change.
- Proper signals for setting the race course - refer to the SI and the Anchor Bay Handbook.
- Into the racing mode
- Check boats in as they arrive at the starting location using scratch sheet
- Check boats that start with each start
- Check boats finishing, their finish position & time on the scratch sheet. Make any note of witnessed infractions or information important to the Protest that is seen or heard.
- Have one person record boat finished in the order of their finish when possible.
Starting the Race:
- Check the time.
- Personnel in place and know their assignments
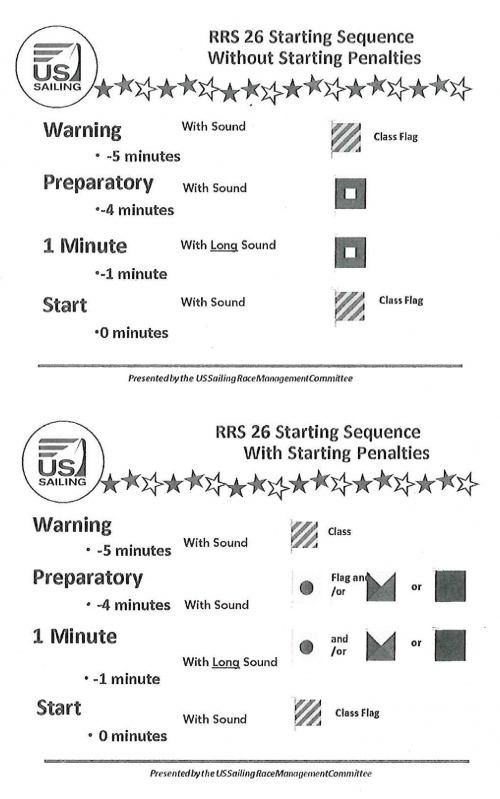
- Start sequence (Know RRS 26)
- What to do during sequence
- Don't Daydream
- Don't visit with the sailors
- Listen to the PRO
- Be aware of where the starting sequence is at all times.
Once race is started:
- Monitor boats racing
- Monitor weather conditions - wind god cannot ignore the changing direction and speed. Write down checks and changed. Inform the PRO of any change. Any course change or finish change must be done in time to get instructions to personnel for preparation.
- Set the finish line, as quickly as possible after the start.
- Shorten or abandon course if weather conditions call for this action.
- Take finished of boats as they complete the course.
On completion of the race:
- Check finished to scratch sheet
- Collect and verify finishes between recorder finish sheets - if the RC has the luxury of more than one.
- Set up cover sheet master to list all finishes and proper finish times.
- Return to dock and record dock time
- Provide finish information to race program manager, verify that all input is correct
- Thank your race committee crew - the RC boat skipper, the mark boat crew, the sailors and the OA.
Verify with race program manager has all information and it is correct. *Always ask if there is any suggestion(s) to improve the performance of the RC. Welcome all comments and input, it make you a better race committee and keeps communication with the racers.